#ESP_Finger 使用ESP8266(NodeMcu)和ESP32與FPC1020AM電容指紋模組做的arduino程式
This is a sample for finger search in database 這是一個將放入的指紋與已存入資料庫的指紋做比對的範例
you can follow this post to get the latest code 你可以追蹤這篇文章來取得最新的程式碼
https://bbs.hassbian.com/thread-2768-1-1.html
指紋偵測運作影片
http://v.youku.com/v_show/id_XMzM5NjE1ODUwNA==.html?sharefrom=iphone&sharekey=ed1334d29354b395d114b663099544e23
Arduino運作影片
http://v.youku.com/v_show/id_XMzQwMjM5NjA2OA==.html?sharefrom=iphone&sharekey=b1966edb1145daf5b56b65709b0fbda41
Hardware list硬體購買清單:
FPC1020AM+QS808 UART輸出輸入指紋模組
https://item.taobao.com/item.htm?id=545528806282
ESP8266-NodeMcu 8266 wifi模組
https://detail.tmall.com/item.htm?id=44766400092
USB-TTL:非必須,但可以用來在PC上連接指紋模組好註冊指紋進模組內給未來搜尋資料庫使用
https://detail.tmall.com/item.htm?id=536700034613
Dupont Line 杜邦線
https://detail.tmall.com/item.htm?id=41065178536
220歐姆電阻
https://item.taobao.com/item.htm?id=5653998305
LED
https://item.taobao.com/item.htm?id=38869571577
Reference參考資料:
指紋模組FPC1020AM_算法板QS808_IDWD1020用户使用手册
https://wenku.baidu.com/view/c174958f4a7302768f993900.html
MQTT教學(六):使用PubSubClient程式庫開發Arduino MQTT應用
https://swf.com.tw/?p=1021
使用USBpcap抓取USB封包內容
https://www.anquanke.com/post/id/85218
額外參考:Mifare RFID-RC522模組實驗(四):Mifare RFID的門禁系統實驗
https://swf.com.tw/?p=1027
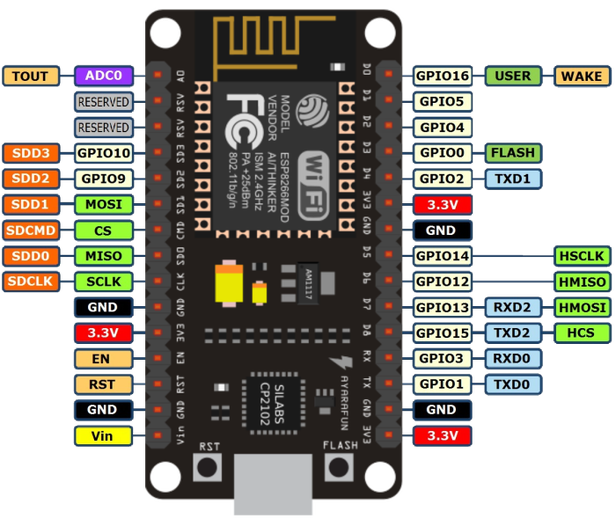
Finger指紋+算法板連接NodeMCU的接腳方式(務必看手冊去接線,接錯模組可能會燒掉)
https://raw.githubusercontent.com/lvidarte/esp8266/master/nodemcu_pins.png
下面為透過usbpcap抓包得到的指紋模組檢查的流程與回應數據
#command
HOST发送 CMD_TEST_CONNECTION指令及模块的响应
HOST命令: 55 AA 00 00 01 00 00 00 00 00 00 00 00 00 00 00 00 00 00 00 00 00 00 00 00 01
Target响应:AA 55 01 00 01 00 02 00 00 00 00 00 00 00 00 00 00 00 00 00 00 00 00 00 03 01
#command1
发送采集指纹图像后模块检测到手指的命令及响应 <-- 連續偵測到有檢測到手指
Host命令: 55 AA 00 00 20 00 00 00 00 00 00 00 00 00 00 00 00 00 00 00 00 00 00 00 1F 01
Target响应:AA 55 01 00 20 00 02 00 00 00 00 00 00 00 00 00 00 00 00 00 00 00 00 00 22 01
发送采集滑动指纹图像后结果超时(FP TimeOut)的命令及响应
CMD_GET_IMAGE :55 AA 00 00 20 00 00 00 00 00 00 00 00 00 00 00 00 00 00 00 00 00 00 00 1F 01
ERR_TIME_OUT: AA 55 01 00 20 00 02 00 23 00 00 00 00 00 00 00 00 00 00 00 00 00 00 00 4A 01
#command2
从ImageBuffer中生成模板数据保存在RamBuffer0中
Host命令包: 55 AA 00 00 60 00 02 00 00 00 00 00 00 00 00 00 00 00 00 00 00 00 00 00 61 01
Target响应包: AA 55 01 00 60 00 02 00 00 00 00 00 00 00 00 00 00 00 00 00 00 00 00 00 62 01
#command3
暂存在RamBuffer0中的指纹模板与1-500编号范围内的指纹比对,返回比对结果 响应內的01=已註冊在指紋資料庫的Finger ID
Host命令: 55 AA 00 00 63 00 06 00 00 00 01 00 F4 01 00 00 00 00 00 00 00 00 00 00 5E 02
Target响应:AA 55 01 00 63 00 05 00 00 00 01 00 01 00 00 00 00 00 00 00 00 00 00 00 6A 01
//程式內需修改的部份
const char *ssid = "your_wifi_ssid"; // WIFI名稱
const char *password = "your_wifi_password"; // WIFI密碼
const char *mqtt_server = "your matt server ip"; // your matt server ip
const char *mqtt_topic = "finger"; // mqtt_topic for HA sensor name
const char *mqtt_unlock_payload = "unlock"; // mqtt_unlock_payload for HA sensor state
const char *mqtt_lock_payload = "lock"; // mqtt_lock_payload for HA sensor state
const char *ota_device_name = "finger_8266"; // OTA_device_name for upload firmware
//if you want to enable ota password, you should uncomment "//const char *ota_upload_password" and "//ArduinoOTA.setPassword(ota_upload_password)"
//要啟用OTA密碼功能的話要反註解下面的 "//const char *ota_upload_password" and //ArduinoOTA.setPassword(ota_upload_password)
//const char *ota_upload_password = "ota_password"; // OTA_upload_password for upload firmware
-
Notifications
You must be signed in to change notification settings - Fork 2
將指紋與資料庫比對成功後,透過wifi將比對結果送給MQTT server,並導入home-assistant做自動化開鎖用
windgo1019/ESP_Finger_Unlock_Arduino
This commit does not belong to any branch on this repository, and may belong to a fork outside of the repository.
Folders and files
| Name | Name | Last commit message | Last commit date | |
|---|---|---|---|---|
Repository files navigation
About
將指紋與資料庫比對成功後,透過wifi將比對結果送給MQTT server,並導入home-assistant做自動化開鎖用
Topics
Resources
Stars
Watchers
Forks
Releases
No releases published
Packages 0
No packages published