- Example:
phu:eggs
- Example:
phu:chicken
Want an icon? Open a custom icon request or contribute to the project.
- Provide a svg file and jpg logo of your request (we also are not mind readers and dont know every icon globaly so if no name is present please add it and a image along with your request.
- links to SVG's or Images will be ignored you must upload the files into your request, ignoring this will result in request being ignored. (if you can not be bothered to spend a few minutes doing this, why should we spend time making it).
- For those who made their own icons, open pull requests on the dev branch.
Make sure to install custom-brand-icons.js into configuration.yaml or ui-lovelace.yaml
All icons are available in the framework Iconify. You can use icons using the prefix cbi. Anyone who uses this icon set via the framework is reminded to comply with the license. For commercial purposes you can contact us
- For all information visit the website https://iconify.design
- For use visit https://iconify.design/docs/usage/
- Browse Icons https://icon-sets.iconify.design/cbi/
To view all the available icons you can go to the following address
We recommend installing Custom brand icons card via Home Assistant Community Store

After installing through HACS:
-
Add the following lines to your
configuration.yamlfrontend: extra_module_url: - /local/community/custom-brand-icons/custom-brand-icons.js
-
(Optional) YAML mode users. Add the following to your lovelace configuration using the Raw Config editor under Configure UI or ui-lovelace.yaml.
resources:
  - type: js
    url: /local/community/custom-brand-icons/custom-brand-icons.js
To add custom repositories please follow this guide. Set URL to `` and category to Lovelace.
-
Download
custom-brand-icons.jsfile from the latest release. -
Copy the
custom-brand-icons.jsfile into<config>/www/the directory where yourconfiguration.yamlresides. -
Add the following to the
frontendsection of yourconfiguration.yamlfrontend: extra_module_url: - /local/custom-brand-icons.js
-
(Optional) YAML mode users. Add the following to your lovelace configuration using the Raw Config editor under Configure UI or ui-lovelace.yaml.
resources:
  - type: js
    url: /local/custom-brand-icons.js
-
Restart Home Assistant.
- Example:
phu:eggs - Example:
phu:chicken
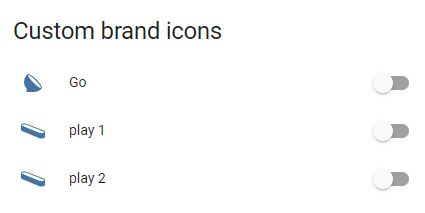
Example of custom brand icons a lovelace card:
entities:
  - entity: light.lampada_entrance
    icon: 'phu:go'
    name: Go
  - entity: light.monitor_2_right
    icon: 'phu:play'
    name: play 1
  - entity: light.monitor_2_left
    icon: 'phu:play'
    name: play 2
show_header_toggle: false
title: Custom brand icons
type: entitiesSome addons (including official) have had some cache issues since 2024.1.1, here are a few work arounds to try
-
first go to settings, dashboard and 3 dots click resorces, add resource
/hacsfiles/custom-brand-icons/custom-brand-icons.js?hacstag=366862031202420 -
Add this second resource too
/local/community/custom-brand-icons/custom-brand-icons.js
- Reload browser by holding CTRL and pressing F5.
- For Mac, hold ⌘ CMD and ⇧ SHIFT, then press R.
- From left sidebar, select on HACS.
- Select on Integrations.
- From the top header bar (Integrations, Frontend), select Frontend.
- Search custom-brand-icons on the search bar.
- Select Custom brand icons.
- From the top right, select the 3 vertical dots which opens a dropdown menu.
- Select Redownload.
- Hard reload browser.
- Open the dropdown menu from Step 6 of Redownload Integration.
- Select Remove, then select Remove again on the popup.
- This should bring you back to /hacs/frontend
- From the top right, select the 3 vertical dots which opens a dropdown menu.
- Select on Custom repositories.
- Find Custom brand icons and select it.
- On the bottom right, select the big blue Download icon.
- Hard reload browser.
Thanks, as always, to the precious contribution to @rchiileea for the creation of the required icons! Do you like these icons? Support the project with a pizza 🍕🍕

- To make an icon in svg format you can use different programs starting from illustrator, inkview, or Inkscape.
- Verify
svgicons are set properly by using text editor of your choice (Notepad++, Notepad, or Visual Studio Code). - The size of the icons must be 24px by 24px.
- The
svgcode must contain viewbox. No transform, translate, or scale. - Make sure to add color: #44739e. Every custom brand icon uses this color.
- Once done, add the svg file in the folder
icon-svgfound in the root of the repo.
Example svg file below:
<?xml version="1.0" encoding="UTF-8" standalone="no"?>
<!-- Created with Inkscape (http://www.inkscape.org/) -->
<!-- path d="..." is unique for each icon -->

<svg
   width="24"
   height="24"
   viewBox="0 0 24 24"
   version="1.1"
   xmlns="http://www.w3.org/2000/svg"
   xmlns:svg="http://www.w3.org/2000/svg">
   <path
     style="fill:#44739e"
     d="..."
    \>
</svg>Add the following entry to the var icons variable (list) of the custom-brand-icons.js file
Example entry:
"Bollard": [0, 0, 24.0, 24.0, "string"]Bollard= svg icon name used forphu:0, 0, 24.0, 24.0= this data can be recovered from the svg fileviewBox="0 0 24 24"- If this data is not present, you can leave the one indicated by me.
string= this data can be recovered from the svg file<path d="M21,12.5 C21,13.33 18.76,...."In particular you will have to enter only the part of the vector code"M21,12.5 C21,13.33 18.76".- For an example, take a look at the icons already inserted.
(Optional) In case you want to create your own perfix you can edit the last line of the custom-brand-icons.js
window.customIconsets["yourprefix"] = getIcon;- Remember to also update the
README.mdfile by inserting the icon's path and the name forphu:.
After adding your svg icon in icon-svg, modifying custom-brand-icons.js, and updating README.md.
Open pull requests on the dev branch.